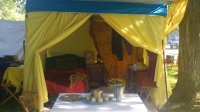
Easy Period Pavilion in a Pinch
This will get you a period looking pavilion for very little cost. You can either purchase one like this which has all the walls and everything or you can make your own walls out of sheets, Sunforger canvas or Duck canvas. You can camp right in the pre-made one. If you use sheets to make the walls, you can camp in it as long as it doesn't rain. It's also good for hiding your "earth pimple" (you know, those modern dome tents, which spoil the atmosphere at events).
Here's how we made ours. In 2016, at the end of the summer season, we bought an 8 x 8 pop-up from Rite Aid when it went on sale for 90% off. It was only $32. We regret not getting a second one.
we took 5 plain flat queen sized sheets that we no longer used. Queen sized sheets fit *perfectly* as walls on an 8 x 8 pop-up as long as it has straight legs. You can get sheets in abundance at thrift stores. Since the roof of my pop-up was blue, I decided to dye the sheets yellow in keeping with the household heraldry. If you do this, just get some Rit Dye and follow the instructions on the box or visit their web page and youtube channel for instructions. We did ours in the washing machine and it was easy-peasy.
Tip: Dye the sheets *after* you add any Velcro as Rit Dye will also dye Velcro.
Now, you can either sew them all together into one long panel to surround the frame, or you can run velcro up the sides and join the panels at the corners with the Velcro. We find that keeping the panels separate makes it much easier for a single person to handle. A single person can easily put them up, take them down, fold them, pack them and wash them in a washing machine. If they're all one long giant piece, or even in 2 giant pieces, it takes 2 people to work with them.
We got a 10 yard roll of 1" Velcro at a good price from Country Brook on Amazon. The direction that the sheets will go is so that the "heading' of the sheets are vertical. You sew the loops to the "outside" on one side of the sheet and the "hooks" on the "inside" of the adjoining side of the next sheet. That way the velcro will overlap to each other and you will never see the Velcro. We also used a Sharpie marker at the top near the corners and marked the corresponding hooks and loops with really small letters like this (click to enlarge) so we would know what direction to start hanging the sheets:
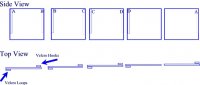
Sew the velcro all the way down the side except for the last 12". The last 12" inches of the sheet will be turned under to form a "sod cloth". The corners will go under the legs of the pop-up which will hold the walls down in place.
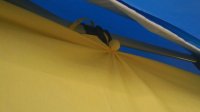
Now, on the top of the walls, you have several options of attaching the sheets to your frame. You can sew on twill tape and tie them to the frame, you can put velcro tabs or you can use something like a small stone or a marble and create no-sew ties like this:
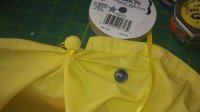
We used the no-sew ties to help us figure out where the Velcro tabs really needed to go. It wasn't until we actually had to hang them that we knew where we wanted them to go. Once we knew where we wanted them to be we added velcro tabs to be able to hang them quickly and easily.
The door is a little tricky. You'll want to fold back 1/3rd of each side of those sheets and overlap them in the middle. You can use either corresponding twill tape to tie the door shut in windy conditions or use Velcro tabs accordingly or, large safety pins, in a pinch.
To put the pavilion together, raise the roof and only extend the legs as far as needed to be able to get under it and hang the walls to the frame in comfort. Once the walls are attached to the top of the frame, extend the legs all the way. Start attaching the walls at the corners with the corresponding Velcro. Then turn the bottoms under towards the inside to create the "sod cloth". Use the bottom of the legs to hold the walls down at the corners. Next will be to either erect your "earth pimple" and put it in there or lay your ground cloth or mats and move in.